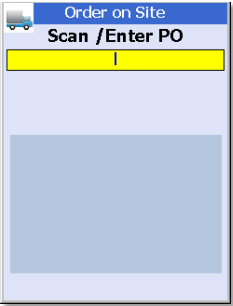
Delivery (On Site)
The ‘Delivery’ option on the main menu allows for a purchase order to be marked as ‘on-site’, if an order is marked ‘on-site’ then the parts/quantities on that order can be seen via various places within Autopart, including Point of Sale and Stock Enquiry. Marking an order as ‘on-site’ does NOT make the stock available for sale, as it still needs to be counted and checked before becoming available.
Upon selecting ‘Delivery’ from the main menu the user will be prompted to enter or scan a purchase order number:
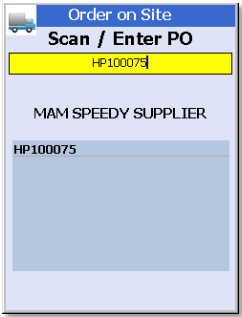
Upon entering or scanning an order number the device will display the supplier that the order is for so as the user can check that they have entered the correct number. If the number/supplier is correct simply hit <Enter> on the keypad to confirm the action.
If an order has been marked as ‘on-site’ mistakenly then it can be undone by simply repeating the above process on the handheld device, or via Purchase Order Enquiry in Autopart.
Goods In
The ‘Goods In’ option is used for receiving parts that have been delivered. As standard the parts delivered would be scanned and then the quantity delivered would go into ‘quarantine’ ready to be inspected and put away on the shelf.
The user will first be prompted to scan or enter a purchase order number:
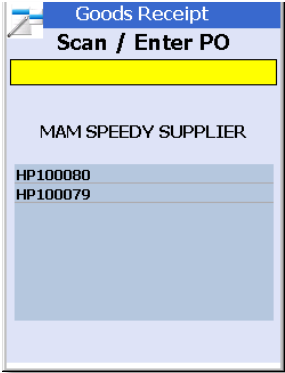
Upon entering or scanning a purchase order number the screen will display the supplier that the order was placed on, this can be used to ensure that the correct number has been entered or scanned.
It is possible to enter more than one purchase order number to receive at a time. To do this simply continue entering purchase order numbers in the screen, the selected order numbers will then be listed. If entering more than one purchase order to receive they do not necessarily need to be from the same supplier.
Once the user is happy that all of the purchase order numbers that parts are being received for have been entered simply press the <enter> key on the device.
The user will then be prompted to scan the part numbers have been received:

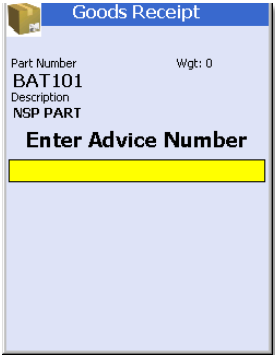
Upon scanning the first part the user will be prompted to enter the advice note number that the supplier has provided, if more than one purchase order has been selected for booking in the user will be prompted for the advice number of each order upon scanning the first part from it.
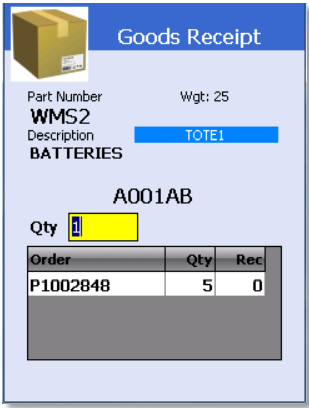
The system will also prompt for a quantity, It is possible at this point to either scan each of the parts received to increment the quantity accordingly, or to type in the quantity received manually.
If the user scans or enters a part number that is not on any of the selected purchase orders they will be prompted with a message at the bottom of the screen, any parts that are not on the order will need to have a purchase order generated for them by an Autopart user if they are to be received in.

Once the user has finished scanning all of the parts that have been received they should exit the screen by using the <Esc> button on the device. This will then generate a Goods Received Note (GRN) for the parts that have been received (if multiple orders were received there will be one GRN for each order), the parts will have been put in to a ‘quarantine’ location to be put away later.
It is also possible during the Goods In process to load the parts received in to a tote/trolley, for them to subsequently be putaway.
To do this the user can scan the desired tote/trolley; all items received after the tote/trolley has been scanned will be assigned to it. The active tote/trolley (TOTE1 below) is displayed on screen:
The selected tote/trolley can be changed at any time by scanning a different one or it can be de-activated by scanning it again. Once the goods receiving process is complete the items in the tote/trolley can be ‘putaway’ using the putaway from location option. Once a user has scanned all of the parts they wish to book in at this time they should press <Esc> on the device, this will then create a GRN for the parts that have been scanned in. If there are still parts on the purchase order yet to be scanned in a user can scan them at a later time by following the same process. A GRN will be generated for each receiving session.
GRN>Locn
The ‘GRN>Locn’ option allows the user to receive goods from a supplier and put them directly on the shelf, thereby skipping the quarantine step of the normal receiving routines.
The process is mostly the same as receiving using the ‘Goods In’ option, it differs slightly in that after entering a quantity of the part the user will be prompted to scan a location where the parts are going:
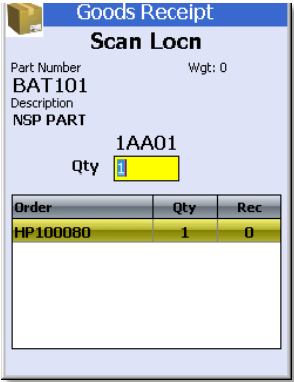
The user should scan the location and then continue to the next part, repeating the process for all parts that have been received on the selected orders.
As soon as each part has been received to a shelf location it will be available for picking from that location. Upon exiting the screen (pressing the <Esc> key on the device) the system will finalise the receiving for that session and generate a GRN.
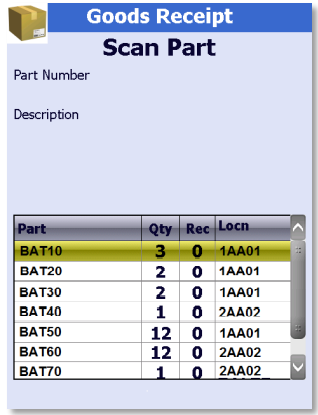
Goods In List
The ‘Goods In List’ option behaves in a very similar fashion to the standard ‘Goods In’ option, when using ‘Goods In List’ though the user is shown a list of all of the parts and quantities on the selected PO that have not yet been received, and as parts are scanned they are removed from the list and/or their ‘rec’ quantity is updated.